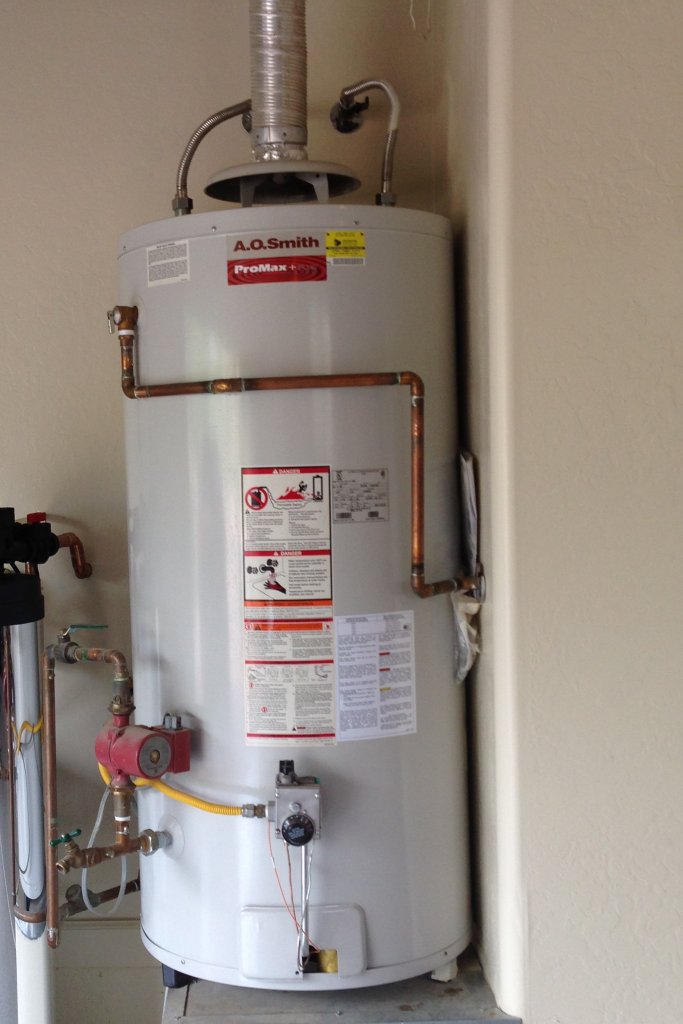
Regularly maintaining your home’s systems, such as its heating and cooling systems, appliances, roof and hot water heaters can prolong their functional lives, save dollars, and signal a potential issue before it gets to an emergency situation. Below are 6 do-it-yourself steps for maintaining your hot water heater.
When water goes into a water heater, sediment and minerals go to the bottom of the tank. Depending on the quality of water at your home, the sediment may accumulate quickly, impacting the efficiency of your water heater and costing you extra dollars to heat the water in the tank.
Left to its own wits, with no flushing, the water heater has to work harder and your tank is eaten by rust. With an annual flushing, you can easily and inexpensively extend the life of your tank.
Before you get started with the steps below, there are 4 things you will need:
- a hose
- a bucket
- a pair of safety gloves
- a pair of safety glasses/goggles
Step 1 – Locate the tank and determine whether it is gas or electric.
In DC Ranch, most hot water tanks are either in a garage, in a mechanical closet in the garage, or in a mechanical closet on the exterior of your home.
To determine whether a hot water tank is gas or electric, look around the tank and read warnings and labels. If it’s a gas water heater, you will see a pilot light.
Since you are going to be dealing with hot water and steam, protective gloves and eyewear are recommended. Read the instructions located on the placard on the tank for turning off the gas or electricity. If you’re not confident about the instructions, don’t do it – call a professional.
Step 2: Locate Valves – Water shut off, Pressure Release and Water Drain
The water shut off valve is on top of the heater. It is typically circular, similar to what you find in your yard. On my hot water heater (pictured) the water valve is above the heater on the wall (top right).
The pressure relief/release valve is either on the top or on the side of the unit. Again, in the picture above, the pressure relief/release valve is near the top of the tank on the left side – it is always labeled. If you can’t find the label, do not proceed.
There is piping extending out of the heater and into the wall. At the other end of that piping (on the exterior of your home) be sure the outlet is not obstructed.
The water drain valve also looks similar to an outdoor water hose valve with a spout. The spout has thread so you can attached a hose.
Step 3 – Turn off Gas or Electricity and Water
If it’s gas, turn off the gas at the shut-off valve you located earlier. If it’s electric, the best way to shut it off is to shut down the circuit breaker.
Turn off the water valve (again, on my unit – above the heater on the wall.)
Step 4 – Attach the hose to the water spout at the bottom of the heater
Once the hose is attached to the water heater and the other end of the hose placed somewhere outside or to an appropriate waste water receptacle, turn on water drain valve (where hose is connected). The water will start draining slowly, then stop.
When the water stops that first time, you need to open the pressure relief/release valve. The water will start running again. Let it run 15 – 30 minutes so that all the water drains out of the tank.
It’s good if the water is dirty – this is your sediment draining, and the stuff you want to get out of your water heater.
Once all the water has drained out, turn on the water at the top of the water tank to flush out the rest of the sediment. Let it run for about 5 more minutes.
Turn off both the water valve and the water drain valve. Then, remove the hose from the water drain valve.
Step 5: Place the bucket under the water drain
While the pressure relief/release valve is still open, turn on the water to the tank and open the water release valve again. This will allow the rest of the sediment to drain out of the tank. A few gallons is fine – just no more than your bucket holds!
If the water is clear, you are all set to refill the tank. If not, repeat steps 3-5.
Step 6: Refill the Water Tank
Verify the water drain valve at the bottom of the tank is turned off.
Close the pressure relief/release valve.
Turn on the water (top of tank or, in my case, on the wall) to get the tank filled again.
Once the tank is full, turn the circuit breaker or gas back on. Be sure NOT to turn on the gas or electric until the water tank is full; otherwise you’ll risk damage to the heating element.
Water tank flushing should be done annually. If your water has a lot of sediment, it’s a good idea to take a bucket once a month and drain 4 or 5 gallons out (depending on the size of your bucket).
For the most accurate and safest instructions on flushing your brand of water tank, use your appliance manual. Most manufacturer’s also have them online.
Maintaining your water heater can save you money during the normal use of your water heater and prolong it’s life.
Look to The Matheson Team, your DC Ranch real estate experts, for more tips on maintaining and improving your DC Ranch home.
Reach out to us for more information, or if we can help you buy or sell DC Ranch real estate.
Don Matheson
Realtor | Founder
The Matheson Team – RE/MAX Fine Properties
21000 N. Pima Rd., #100, Scottsdale, AZ 85255
480-360-0281
don@scottsdalerealestate.com


